Dani AI Manual
Manual on how to use Dani AI
Welcome to Dani AI’s manual. This manual will provide a brief overview of Dani AI’s architecture and workflow.
Getting Started
Installation
- Download Dani AI from the Unity Asset Store.
- Import the downloaded Unity package into your project.
Updating Dani AI
To safely update an older version of Dani AI to a newer version:
- Delete the following DLL files:
dani-ai.dlldani-ai-editor.dll
- Re-import Dani AI from the Unity Asset Store
Components
What are the main components of Dani AI?
AI Brain
The AIBrain is a component that controls which set of actions the AI executes. Like MonoBehaviour scripts in Unity, it attaches to a GameObject in the Inspector.
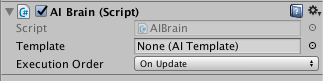
Each field in the AIBrain is explained in the table below.
| Field | Description |
|---|---|
| Template | Defines the set of behaviours that the AIBrain can perform. |
| Execution Order | Defines when the brain will execute a step. See below. |
The AIBrain can run in one of three modes:
- On Update runs on Unity’s
Updatecall - On Fixed Update runs on Unity’s
FixedUpdatecall - By Script allows the AIBrain’s methods to be called manually by another script
AI Template
While the AIBrain decides on a set of AI behaviours to run, it needs to know what behaviours it can possibly run. These behaviours are stored in assets known as AITemplate, which are created by right-clicking in the Project window and clicking Create -> Dani AI -> AI Template.
| Field | Description |
|---|---|
| Comments | Write a descriptive comment so others know what this Template does. |
| Open in the Editor | Opens a custom editor for you to edit the AI’s behaviours. |
Node Editor
The node editor is a visual tool where the internal properties of the AI can be changed.
The editor can be accessed by clicking
Tools -> InitialPrefabs -> Dani AI -> Open Editor.
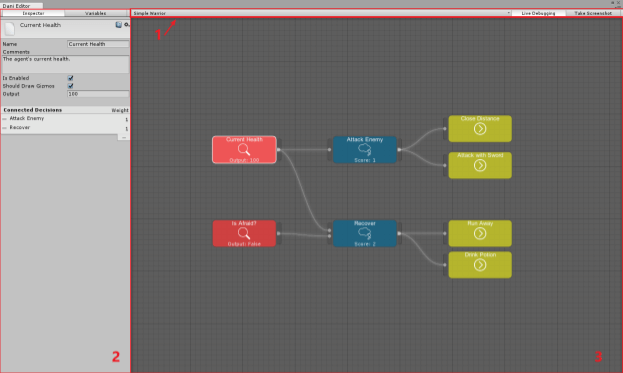
The node editor comes in three parts as indicated by the image above.
| Number | Name | Description |
|---|---|---|
| 1 | AI Template Toolbar | Shows the current AITemplate being edited, as well as enabling debugging during Play Mode and taking screenshots. |
| 2 | Context Menu | Shows an inspector of selected nodes. |
| 3 | Graph Editor | Show the nodes inside an AITemplate. |
Much of your work will be in the Graph and Context Menu.
Workflow
In reality, many animals from ants to humans tend to follow three basic rules whenever it wants to do something:
- Observe the immediate surroundings
- Decide on what to do
- Enact on the decision
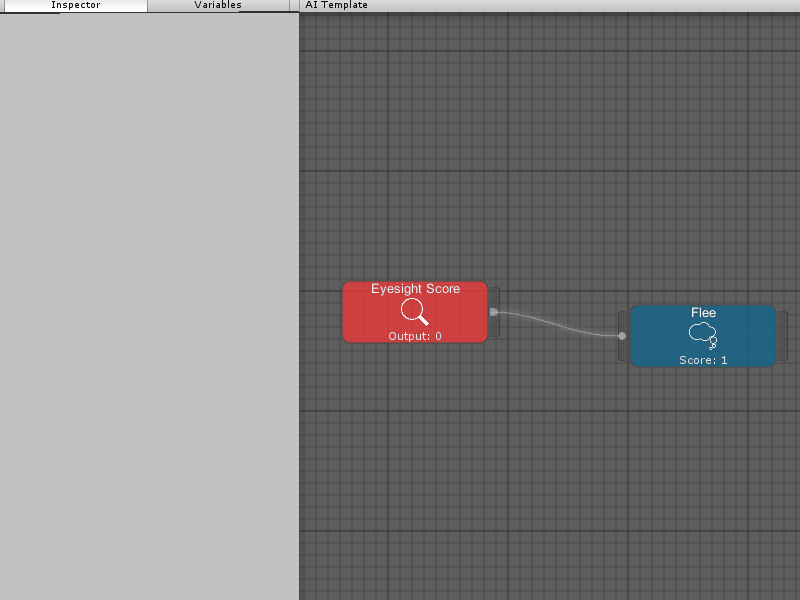
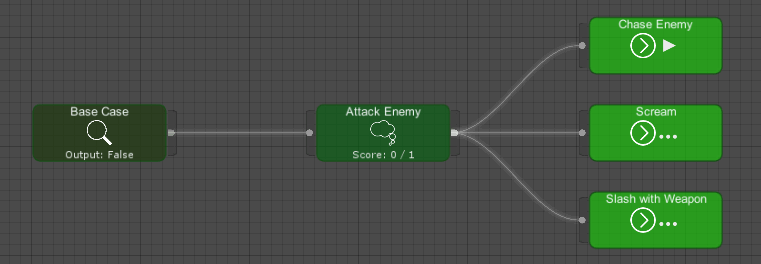
Dani AI models these rules in the form of nodes connecting to each other to create a context of what the AI will do. Each node is specialized in general groups according to the chart below:
| Node Type | Description |
|---|---|
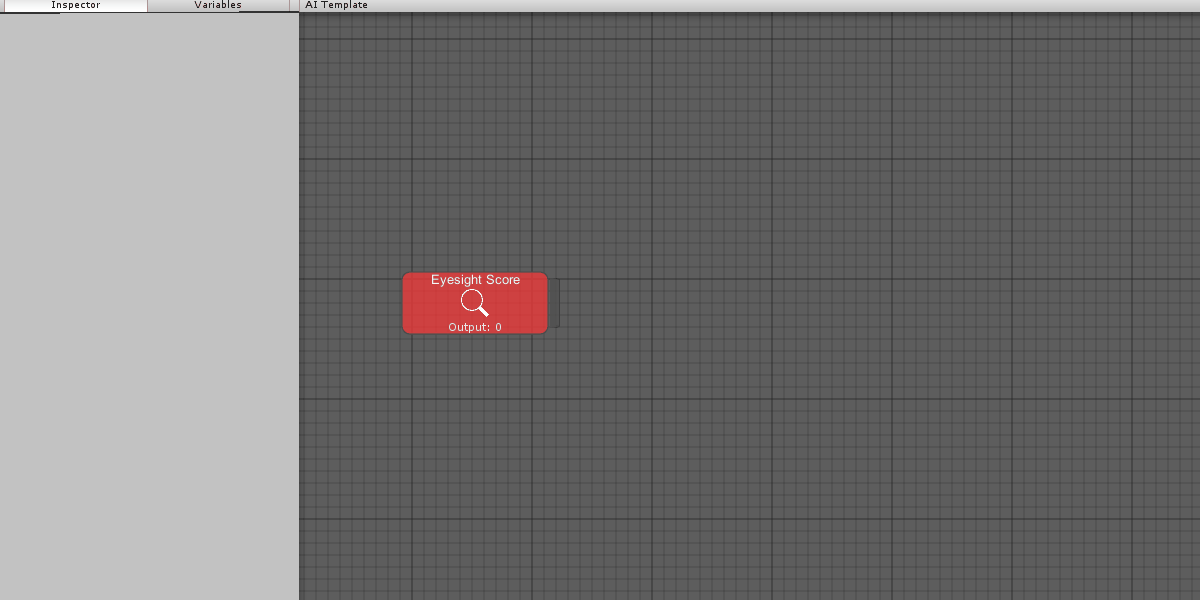
| Observer | Gathers information for the AI based on the current surroundings, e.g. the agent’s current health. |
| Decision | Contains actions that are executed when certain conditions run, e.g. running away when low on health. |
| Action | What the AI is currently doing or will do, e.g. finding a point to run away to and play the run animation. |
The entire behaviour within Dani AI runs in the following order:
- Observer
- Decision
- Action
Thus, observers gather information similar to an organism’s senses, decisions act as an organism’s thought patterns, which are then supplemented by a series of actions to perform the thought.
The workflow is pretty simple:
- Observe information (Observer)
- Process observed information (Decision)
- Enact on observe information (Action)
Luckily, Dani AI’s Editor provides an intuitive way for you to use that workflow.
Nodes
Creating Nodes
Add Observer -> Float Observer, or any observer script you wish to add. The same can be done with Decision and Action nodes, in their respective submenus.
To edit any property in the AI Node, such as name, comments and other values, click on the node, and its properties should appear in the inspector panel.
Connecting Nodes
AI Nodes must be connected together to create a complete context for a specific scenario. These connections follow certain rules:
- Observers are connected to Decisions
- Decisions are connected to Actions
The inverse (such as decisions to observers), are also allowed.
To create a connection, drag the mouse from one endpoint of the node to another. A bezier line should appear between the two nodes. To view the connection, click on the line and its information should appear in the inspector panel.
Decisions
Creating Conditions
When Dani AI selects a Decision to execute, it asks all of its Decisions to calculate a score based on their connected observers. The highest Actual Score wins and Dani AI will then execute the decision. When multiple decisions output the same highest score, Dani AI will select a random decision from that set.
Since each observer contains a particular type of information, there is a condition for each type. In Dani AI, there are three basic types that are natively handled:
intfloatbool
As long as Observers output one of these types, you don’t need to worry about creating your own Conditions.
To finetune condition values, simply click on the bezier line like any connection, and the condition should appear in the inspector window.
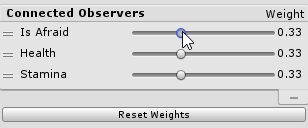
Condition Weights
Every connection between an Observer and a Decision contains a Condition. By default, each Condition equally contributes to their corresponding Decision(s). To modify the weight of each Condition we can click on the Decision and move the sliders in the inspector.
These sliders act like the sliders on the Humble Bundle contributions page. When you increase one of the sliders, the other sliders will decrease proportionally. The total of all weights is always ~1. Each Condition takes a percentage of the max score that can be generated for the Decision.
In the table below, we state that our first Condition Weight 1 can only generate at most a subscore of 0.3. Condition Weight 2 can only generate at most a subscore of 0.7. Our Total Subscore can be at most ~1 and is multiplied by our Decision’s Priority.
Our potential score follows the formula:
Potential Total Score with Weights = SUM(all_condition_subscores) * Priority
| Condition Weight 1 | Subscore 1 | Condition Weight 2 | Subscore 2 | Total Subscore | Priority | Potential Total Score with Weights |
|---|---|---|---|---|---|---|
| 0.3 | 0 | 0.7 | 0.7 | 0.7 | 3 | 2.1 = ((0 + 0.7) * 3) |
NOTE: We try to accurately display information, but due to limitations of floating point precision, we treat that 0.33 + 0.33 + 0.33 as 1.
In the event we would like to restore our default weights, a Reset Weights button is provided in the inspector. This equally distributes the Conditions’ weights.
Actions
Modifying Execution Order of Actions
Action Run Types
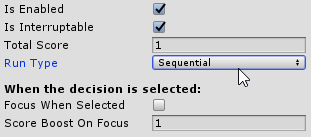
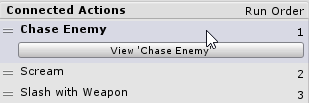
When forming connections between Decisions and Actions, Dani AI gives you the ability to control the order of Actions that will be executed. This is done by selecting a Decision and changing the order in Connected Actions in the Inspector.
By default, all connected Actions run sequentially. By selecting the drop down menu, Run Type, we can change the run type to one the following:
Sequential- Runs all connected Actions sequentially.
Random- Selects one connected Action randomly and runs it.
Concurrent- Runs all connected Actions until all of them succeed or at least one of the them fails.
We can change the Decision’s run type as displayed in the GIF below.
Action Reordering
We can change the order of execution for the Actions as shown below:
Editor Info
When the AIBrain runs your AITemplate in Play Mode, icons are shown in the Action to display their current state:
- An action is currently running.
- An action is currently waiting to run.
- An action succeeded.
- An action failed.
Here is an example of setting the run type to Sequential
Here is an example of setting the run type to Concurrent.

Sharing Information Between Nodes
Sometimes, you want to share information between nodes. An example is gathering the positions of an enemy squad from an Observer and reusing those positions in an Action. Dani AI provides support for this in the form of a Variable, much like how the Animator Controller in Unity contains a parameter list.
All Variables live inside Templates and Variables provide a convenient way to store values in the context of an Template.
To access Variables in the editor, click on the Variables tab in the Inspector Panel. To create Variables click on the plus (+) button and select a Variable script in the context menu.

Accessing a Variable Inside a Template
We’ve created a Variable, but we need to fetch that Variable’s data amongst Observers and Actions inside our Template. Assuming we have the following scripts:
- Variable
Vector3Variable.cs
- Action
MoveTo.cs
Our MoveTo class would need to fetch the Vector3Variable from our Template by calling
Template.GetVariable<T>(string).
// Vector3Variable.cs Example
using InitialPrefabs.DaniAI;
public class Vector3Variable : GenericVariable<Vector3> {
    // This is generally an empty class
}
// MoveTo.cs Example
using InitialPrefabs.DaniAI;
public class MoveTo : Action {
// This can be set to a custom name that defines the Vector3Variable
public string vectorVarName = "Vector3Variable";
private Vector3Variable vectorVar;
private UnityEngine.AI.NavMeshAgent agent;
public override void OnStart() {
// Fetch all variables
vectorVar = Template.GetVariable<Vector3Variable>(vectorVarName);
agent = GetComponent<UnityEngine.AI.NavMeshAgent>();
}
public override void OnActionStart() {
#if UNITY_5_5_OR_NEWER
agent.isStopped = false;
#else
agent.Resume();
#endif
// Use the vectorVar's stored Vector3 and set the destination
agent.SetDestination(vectorVar.Value);
}
public override ActionState OnActionUpdate() {
if (agent.remainingDistance <= 2f) {
return ActionState.Success;
}
return ActionState.Running;
}
pubic override void OnActionEnd(ActionState state) {
#if UNITY_5_5_OR_NEWER
agent.isStopped = true;
#else
agent.Resume();
#endif
}
}Accessing a Variable Outside the Template
Variables can also be accessed outside of a Template. Templates are stored inside an AIBrain and
AIBrain exposes the Template property. Assuming we have a script that accesses our AIBrain we
can do the following:
using UnityEngine;
using InitialPrefabs.DaniAI;
public class VectorModifier : MonoBehaviour {

    public string variableName = "Variable";

    private AIBrain brain;
    private Vector3Variable vectorVar;

    private void Start() {
        brain = GetComponent<AIBrain>();
        vectorVar = brain.Template.GetVariable<Vector3Variable>(variableName);
    }

    private void Update() {
        // Generate and store the random vector every frame.
        vectorVar.Value = new Vector3(
                            Random.Range(0, 1),
                            Random.Range(0, 1),
                            Random.Range(0, 1));
    }
}
Keyboard Shortcuts
The editor for Dani AI contains a set of keyboard shortcuts to speed up certain actions:
| Shortcut | Description |
|---|---|
| Delete | Deletes a selected node or connection |
| Control + Z | Undos an action in Dani |
| Control + Y | Redos an action in Dani |
| Alt + (Minus) | Zooms out by 10% |
| Alt + (Equals) | Zooms in by 10% |
| Alt + 0 | Resets the zoom |
Extending Dani AI
Each node can be extended and custom coded to fit your AI’s design.
All examples below are written using Unity 5.6 and higher.
Observers
To create an Observer, derive from GenericObserver<T>, where T is your desired output
type (e.g. float, int, bool, etc). The functions to override within the GenericObserver<T>
are listed below in the following table.
| Function to Override | Description |
|---|---|
OnStart() |
Like MonoBehaviour’s Start() function, all initializations go here |
T OnObserverUpdate() |
Like MonoBehaviour’s Update() function, but it must return the variable output of type T |
Here’s an example of creating a custom Observer that measures the speed of a rigidbody:
using InitialPrefabs.DaniAI;
using UnityEngine;

public class SpeedObserver : GenericObserver<float> {

    private Rigidbody rigidbody;

    // Use this for initialization, like Unity's Start() call
    public override void OnStart() {
        rigidbody = GetComponent<Rigidbody>();
    }

    // Like Unity's Update() call
    public override float OnObserverUpdate() {
        return rigidbody.velocity.magnitude;
    }
}
Decisions
We will support overriding Decisions at a future date.
Conditions
To create a new Condition, derive from the GenericCondition<T> class, where T is the type of output for the Condition.
| Function to Override | Description |
|---|---|
| CalculateLocalWeight() | Processes the output from the observer and returns a 0 if the condition is false and 1 if the condition is true. |
using InitialPrefabs.DaniAI;
using UnityEngine;

public class VelocityCondition : GenericCondition<Vector3> {
    public enum MoveType { Idle, IsMoving }
    public MoveType comparison;

    // Override this method to validate the observer's output.
    public override float CalculateLocalWeight () {
        var value = observer.Output;

        if (comparison == MoveType.Idle) {
            // If the magnitude is 0, return a 1, otherwise return a 0
            return value.magnitude == 0 ? 1 : 0;
        }
        else {
            // If the magnitude is greater than 0, return a 1, otherwise
            // return a 0
            return value.magnitude > 0 ? 1 : 0;
        }
    }
}
Actions
To create a custom Action, derive from the Action class. See the table below to see which
functions to override.
| Function to Override | Description |
|---|---|
OnStart() |
Like MonoBehaviour’s Start() function, all initializations go here |
OnActionStart() |
Called on the first frame that the Action is running. |
OnActionUpdate() |
Called every frame while the Action is running. Returns ActionState.Running, ActionState.Fail, or ActionState.Success. |
OnActionEnd(ActionState state) |
Called at the very last frame when Action finishes successfully or unsuccessfully. The state variable contains the info that the Action was a success or failure. |
Here’s an example of an Action script that moves a GameObject containing a NavMeshAgent.
using InitialPrefabs.DaniAI;
using UnityEngine;
using UnityEngine.AI;

public class Move : Action {
    public Vector3 destination;
    private NavMeshAgent agent;

    // Use this for initialization, like Unity's Start() call
    public override void OnStart() {
        agent = GetComponent<NavMeshAgent>();
    }

    // Runs at the first frame the Action is active
    public override void OnActionStart() {
        agent.destination = destination;
        agent.isStopped = false;
    }

    // Runs every frame after OnActionStart()
    public override ActionState OnActionUpdate() {
        if (agent.remainingDistance <= agent.stoppingDistance) {
            return ActionState.Success;
        } else {
            return ActionState.Running;
        }
    }

    // Runs at the very last frame before the Action is disabled
    public override void OnActionEnd(ActionState state) {
        if (state == ActionState.Success) {
            Debug.Log("I've arrived!");
            agent.isStopped = true;
            agent.ResetPath();
        } else {
            Debug.Log("Couldn't reach my destination.");
        }
    }
}
Variables
To create a Variable of any type, simply create a class that derives from GenericVariable<T>,
where T is the desired type you need. See the example below.
using InitialPrefabs.DaniAI;
using UnityEngine;
using UnityEngine.AI;

public class Vector3Variable : GenericVariable<Vector3> {
    // That's it!
}